|
|
 |
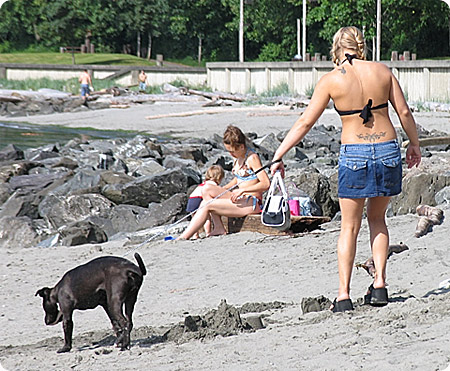
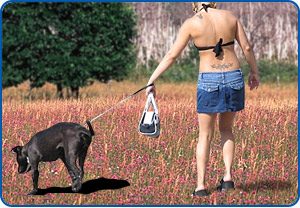
-
by using the PEN tool and carefully 'tracing' around the girl
and dog I created a path, which I then converted into a selection.
ash. No telling what that dog would do if we didn't keep it on
that leash! :)
For
a much more detailed explanation of the above technique check
out this
tutorial.
For
other info on selections (or masks) check out Ledirlo's tuts here
and here. |
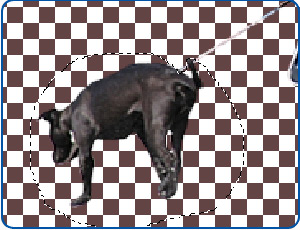 |
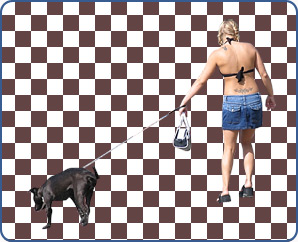
-
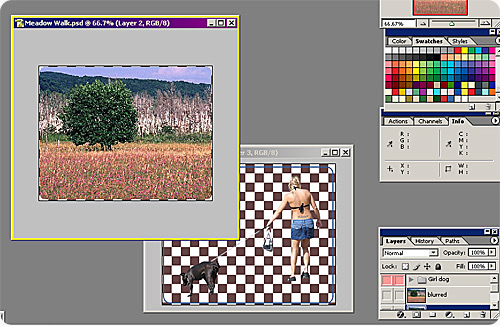
we'll need our three-legged friend under separate control, so
we'll chop him out now. Put a ruff lassoo around him cutting
close where the lease attaches to his body.
Then
press CNTRL+SHFT+J (PC) and he will be magically transported
to a new separate layer.
(he
really does only have three legs, another reason to keep that
leash on him! Don't want him to loose another leg or he's in
REAL trouble!)
|
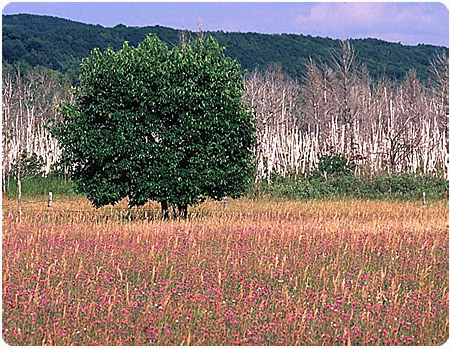
So
we've got a gal and a leash (be still my happy heart!) and a
three legged dog. Let's get them off the beach.
Open
up the original pic #2, the tree and the field. Here's a neat
trick. Have the pic with the cut out gal and dog open on your
desktop. And have the pic#2 also open on your desktop. Size
them up so you can see both. MAKE SURE that you have the DOG
layer and teh GIRL layer LINKED (click on the GIRL layer and
then click in the gray empty box to the left of the DOG layer
and a little "chain link" will appear).
Select
the PICK tool  and make sure that
  is checked. Click on the girl.
While holding the right mouse down drag the girl from her window
into the tree/field pic and release. If you did it right the
dog went obediently along with her, while maintaining his own
layer! (you can use this method to drag multiple layers from
pic to pic. You can also first put the layers in a folder as
well, and then drag the folder from one pic to the other.)
|
 |
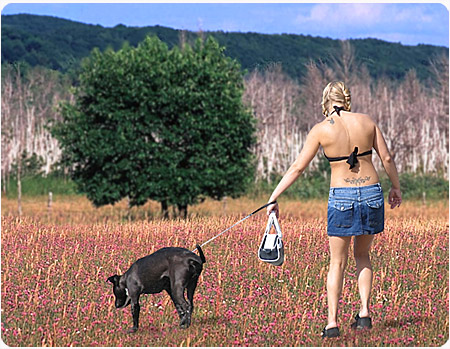
-
okay, they are off the beach and in the field. One important
point here is that I chose the field picture because it had
a simular perspective to the beach picture. Also I made sure
that the lighting was simular. Although you can play a lot with
lighting and shadows in PS, it is always easier to pick well
matched bits!
But
it still looks a wee bit faked.
Firstly,
she looks weird up there above the doggy. This is why I wanted
to control Lucky (the three legged dog) separately.
|
 |
-
make sure the dog layer is on TOP of the girl layer. Go to the
LINK button and UN-LINK the girl and the dog (unleash them,
so to speak!).
-
move the doggy UP the leash and towards the girl, then re-link
them. Move them both into a more 'artisitaclly pleasing' position
in the forground.
-
better, but not quite right yet. Let's see what be can do about
their feet. And we also need to deal with the fact that they
are casting NO shadows. Unless we are working on a vampire pic,
this won't do!
|
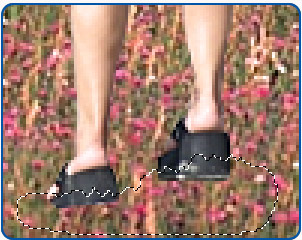 |
-
zoom in on her feet. Take the lasso and do a ruff outline that
roughly follows the shape of the grass and flowers around her
feet. Don't worry about the bottom of the selection too much,
the important part is the part that overlaps her shoes.
With
the FIELD/TREE layer selected press CNTRL+J (no SHFT). This
will magically put a copy of the selected area in a layer above
the FIELD/TREE layer. Now take the copied layer and move it
ABOVE the girl layer.
|
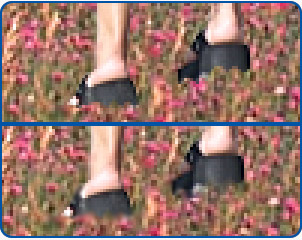 |
-
you'll see that her shoes look more "IN THE GRASS"
now, but still a bit fake looking. Take the ERASER tool with
about 40% opacitiy and a medium feathered edge and rub out and
soften the sharp edges of the patched grass and flowers. You
should get an effect simular to what is at left bottom.
You
can get the same idea without cutting out extra grass but using
the clone tool / rubber stamp tool. But I like this way as it
leaves me a layer that I can change or modify later.
Do
the same to the doggies three legs!
|
 |
-
Okay, looking at the original beach picture we can see that there
is some shadow action happening there. Analizing the original
shadows we see the size and angle they need to be. Create a NEW
LAYER above the FIELD/TREE layer but BELOW the dog and girl layer.
I used the lassoo to draw a rough selection approximating the
shadow shape. I then filled it with 100% black. Since the grass
and flowers is a less flat surface than the sand, the shadow need
to be softer. I used GUASSIAN BLUR and then put the opacity of
the shadow layer to about 40%. The girl is done, the dog is still
in the unedited shadow stage. |
|
Almost Done! As it stands, not too bad. But being a photographer
I know that there is one more thing we can do to make this an
interesting picture. The composition is good with the dog and
the girl and the tree forming a nice triangle flow. But that tree
is just a wee bit too overbearing. I want the viewer to really
track the girl and Lucky, and not notice the tree as much. So
I'll apply some "depth of field" to the background.
Depth
of field is a great way to control a busy background, and keep
the viewers eyes on the forground. With a pro camera you set the
lense in a way that the focus drops off behind the subject. Since
my background was originally shot to be sharp all over we'll have
to let Photoshop help us out in the post-production phase. |
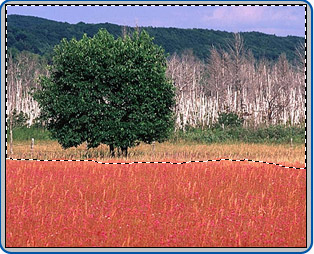 |
-
hide the Girl/Dog/Shadows/grass layers for now. Select the FIELD/TREE
layer and then using the lassoo tool draw a rough line along the
field just in front of the tree. If you look close you'll see
there is a natural line of the field grass where you can divide
your picture. I've show the selection at left with the QUICK MASK
mode on so you can see where I've selected better. For a even
better effect fade the selection from the front (advance work!).
Hit ALT+CNTRL+D to pick the selection feather and put in 1 or
2 pixels.
With
the FIELD/TREE layer selected go to filters and pick Guassian
Blur. I used about 1 pixel, but do it to your taste. Try to not
go too crazy with this or it will look really fake. It is like
a seasoning! |
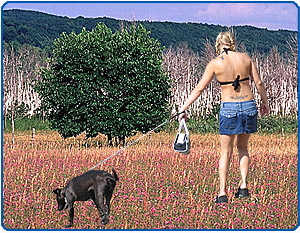
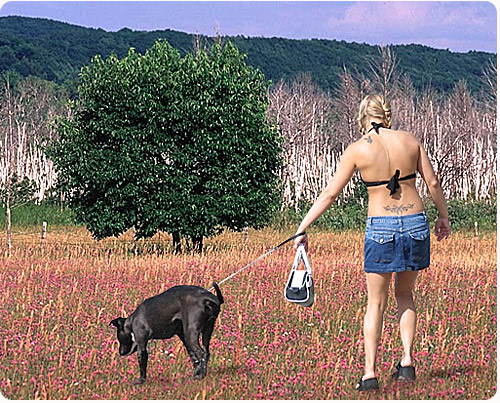
Okay.
Turn on all the layers and you should have a happy three-legged
dog taking his two-legged owner for a walk in a nice meadow.
|
Some
things we used to
make this image are: |
1) sectioning
selected layers for more control of image placement
2)
direct dragging of multiple layers from one image window
to another.
3)
CNTRL+SHFT+J to cut a selection and automatically place
it in a new layer. And CNTRL+J to copy a selection into
a new layer above.
4)
adding forground bits to 'blend' your cut-outs into the
background
5)
faking "depth of field" to add depth to images,
and basic composition control.
6)
three-legged dogs are sometimes "Lucky". :) | |